Introduction: OverEngineered Pen Holder 3.0


Greetings everyone, and welcome back.
Here's something useful: The Overengineered Pen Holder Version 3.
As the name suggests, this is a pen holder made from scratch using 3D-printed parts.
We added the XIAO Expansion Board on front of this Pen Holder to give this normal holder a display on which we can display a bunch of stuff, like two dilating eye animations on the display, and then added a Pen Holder-related quotes sketch that displays quotes one after another.
The XIAO SAMD21 M0 microcontroller is being used here to drive the expansion board's display.
We utilized a 1200mAh 3.7V Li-ion cell to power this setup, which was connected to the expansion board's Battery CON connector. The extension board has an onboard Li-ion cell charging IC setup, which we used to effectively charge the cell.
This article is about the whole build process of this project, so let's get started with the build.
Supplies
These were the materials used in this project:
- XIAO Expansion Board
- XIAO SAMD21 M0 Microcontroller board
- 3D-printed parts
- Li-ion Cell 3.7V, 1200mAh
- Switch
- M2 Screws
Step 1: XIAO EXPANSION BOARD and XIAO SAMD21 M0 DEV Board
We're using the XIAO SAMD21 M0 Development Board, which, paired with the XIAO extension board manufactured by Seeed Studio, is the heart of this project.
It comes with rich peripherals that include an OLED, RTC, SD Card Sot, passive buzzer, reset/user button, 5V servo connector, and Grove connector for pairing multiple Grove devices with XIAO.
We can power the entire setup using any Li-ion or LiPo cell thanks to its integrated Li-ion charging circuit; later in the project, we will be using a Li-ion 18650 cell to power the whole setup.
One of the reasons for using the expansion board was its intergraded OLED display, which we will be using for displaying the Dilating Eye and Quote Sketches.
Step 2: DESIGN
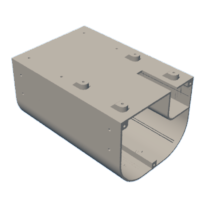
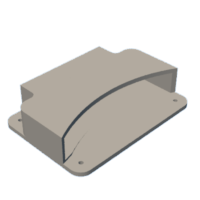
The project's model comprises four parts in total: the front holder part, which is designed for holding small things like USB drives, coins, etc., and the upper lid section, which covers the lithium cell and holds the rocker switch in its place. Finally, a nametag with the project title "Overengineered" is positioned on the left side of the stand.
Three M2 screws are required to mount the upper lid on the screw bosses found in the holder part. The XIAO expansion board is mounted using four screw bosses specially made on the front face of the Holder section. These bosses allow the XIAO expansion board to be positioned slightly beyond the front face, maintaining a small gap between the front face and the bottom side of the board.
After creating the model in Fusion 360, we exported the mesh files so that they could be 3D printed.
We used clear PLA to print the holder section, orange PLA for the upper lid portion, and PLA for printing the front holder portion. In order to print the letters on the nametag, we first print the white PLA base of the tag and then switch to orange PLA in the middle of the print.
You are free to download or edit any of the files that are attached.

Step 3: Body Assembly
- Installing the rocker switch on the upper lid part is the first step in the body assembly process.
- Next, we soldered a second wire to the rocker switch's NC terminal and connected the negative of the Li-ion cell to the switch's NO terminal. This NC will be linked to the negative terminal of the expansion board's Li-ion cell connector.
- The front holder part was then placed on the front face of the holder section, and it was fastened in place using four M2 screws.
- The Li-ion cell is inserted into the holder section, and then the upper lid part is placed on top of it. Three M2 screws are used to fasten both sections together.
Step 4: Expansion Board Assembly
Now we pair the expansion board with the 3D model.
- First, we connected the expansion board's battery terminal to the power supply, a li-ion cell.
- We connect the positive and negative of the Li-ion cells to the expansion board's battery terminals using a soldering iron.
- The XIAO expansion board is then positioned on the front face, and the circuit and holder are fastened together using four M2 screws.
- Finally, we used four M2 screws to attach the nametag in its proper location.
The assembly is now complete.
Step 5: EYES DILATING SKETCH
For testing the setup first, we added a simple animation-based sketch that we generated from CHAT GPT by giving it the below input.
"Write a sketch where the pupil dilates and two eyes are visible. The SSD1306 library from Adafruit is used in this sketch for the SSD1306 display."
We were able to generate code for a simple drawing like this with the help of AI Help, and the result is remarkable. Hopefully, artificial intelligence (AI) will progress well beyond this point and be able to help with the creation of intricate code.
#include <Wire.h>
#include <Adafruit_GFX.h>
#include <Adafruit_SSD1306.h>

#define SCREEN_WIDTH 128  // OLED display width, in pixels
#define SCREEN_HEIGHT 64  // OLED display height, in pixels

// Declaration for SSD1306 display connected using I2C
#define OLED_RESET    -1  // Reset pin # (or -1 if sharing Arduino reset pin)
Adafruit_SSD1306 display(SCREEN_WIDTH, SCREEN_HEIGHT, &Wire, OLED_RESET);

// Define eye parameters
const int eyeCenterX1 = 40; // X position for left eye
const int eyeCenterX2 = 88; // X position for right eye
const int eyeCenterY = 32;  // Y position for both eyes
const int eyeRadius = 20;   // Radius of the eye
const int minPupilRadius = 5;   // Minimum radius of the pupil
const int maxPupilRadius = 10;  // Maximum radius of the pupil
const int animationSpeed = 10;  // Speed of the animation

void setup() {
  // Initialize the display
  if(!display.begin(SSD1306_SWITCHCAPVCC, 0x3C)) {
    Serial.println(F("SSD1306 allocation failed"));
    for(;;); // Don't proceed, loop forever
  }
  display.display();
  delay(2000); // Pause for 2 seconds

  // Clear the buffer
  display.clearDisplay();
}

void loop() {
  for (int i = minPupilRadius; i <= maxPupilRadius; i++) {
    drawCatEyes(i);
    delay(animationSpeed);
  }
  for (int i = maxPupilRadius; i >= minPupilRadius; i--) {
    drawCatEyes(i);
    delay(animationSpeed);
  }
}

// Function to draw the cat eyes with dilating pupils
void drawCatEyes(int pupilRadius) {
  display.clearDisplay();

  // Draw left eye
  display.drawCircle(eyeCenterX1, eyeCenterY, eyeRadius, SSD1306_WHITE);  // Eye outline
  display.fillCircle(eyeCenterX1, eyeCenterY, pupilRadius, SSD1306_WHITE); // Pupil

  // Draw right eye
  display.drawCircle(eyeCenterX2, eyeCenterY, eyeRadius, SSD1306_WHITE);  // Eye outline
  display.fillCircle(eyeCenterX2, eyeCenterY, pupilRadius, SSD1306_WHITE); // Pupil

  display.display();
}
This code will animate the pupils of the cat's eyes on the OLED display, simulating a dilating effect. Adjust the eyeCenterX1, eyeCenterX2, eyeCenterY, and radius parameters if needed to fit the display properly.
Step 6: QUOTES DISPLAY SKETCH
Finally, we tested out the next sketch, which was the quote sketch.
We first generated a bunch of witty "electronics-based pen holder with a screen" quotes from ChatGPT.
We then chose a couple quotes, such as "I hold pens and your secrets." We are going digital, so hold onto your pencils!", "Shhh!", and more. For the SSD1306 display, we created a basic text display sketch and entered all of the quotes into it so that each text would appear after two seconds.
This was the sketch.
#include <Wire.h>
#include <Adafruit_SSD1306.h>
#include <Adafruit_GFX.h>

#define OLED_WIDTH 128
#define OLED_HEIGHT 64

#define OLED_ADDR   0x3C

Adafruit_SSD1306 display(OLED_WIDTH, OLED_HEIGHT);

void setup() {
  display.begin(SSD1306_SWITCHCAPVCC, OLED_ADDR);
  display.clearDisplay();
}

void loop() {
  display.clearDisplay();
  display.setTextSize(1);
  display.setTextColor(WHITE);
  display.setCursor(0, 20);
  display.println("I hold pens and your secrets. Shhh!");   //QUOTE01
  display.display();
  delay(2000);

  display.clearDisplay();
  display.setTextSize(1);
  display.setTextColor(WHITE);
  display.setCursor(0, 20);
  display.println("Hold onto your pens, we are going digital!");  //QUOTE02
  display.display();
  delay(2000);

  display.clearDisplay();
  display.setTextSize(1);
  display.setTextColor(WHITE);
  display.setCursor(0, 20);
  display.println("Penning down ideas, one byte at a time!"); //QUOTE03
  display.display();
  delay(2000);

  display.clearDisplay();
  display.setTextSize(1);
  display.setTextColor(WHITE);
  display.setCursor(0, 20);
  display.println("Who needs a diary when you have a pen holder with a screen?!"); //QUOTE04
  display.display();
  delay(2000);


}
Step 7: CONCLUSION
The end result was a pen holder with a programmable display, which is quite helpful for managing pens and other items.
Because of the display, there are a gazillion different concepts that we can try out here. To show the time, we can add an Internet Watch sketch to the XIAO. Alternatively, we can add a melody player sketch that uses the SD card, the display, and the buzzer. Finally, we can add a Flappy Bird-like game to the XIAO, which can be played using the onboard push button.
Applications are many, and this project is a complete success and needs no further revision.
Check out the previous version of the Over Engineered Pen Holder Project from the below links:
https://www.instructables.com/OverEngineered-Pen-Holder/
https://www.instructables.com/OverEngineered-Pen-Holder-20/
Both previous projects were made using PCBs as the main body, but version 3 was 3D printed.
Leave a comment if you need any help regarding this project. This is it for today, folks.
Thanks to Seeed Fusion for supporting this project.
You guys can check them out if you need great PCB and stencil service for less cost and great quality.
And I'll be back with a new project pretty soon!


